Sew a Softie - Rainbow Quilt

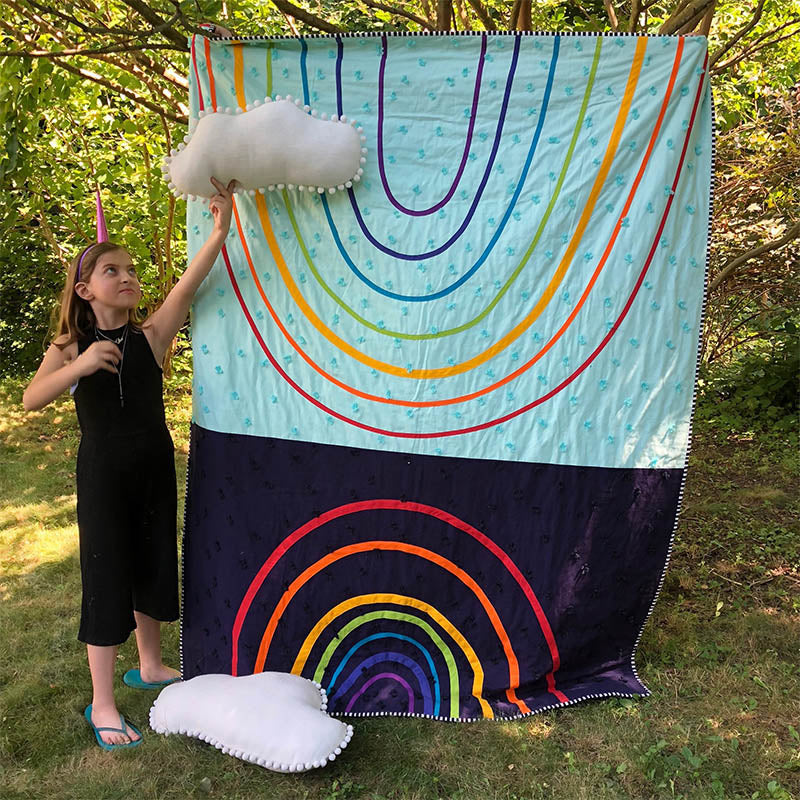
A Rainbow Quilt! Perfect for sweet dreams or daydreams, this double rainbow quilt utilizes simple bias tape appliqué. This quilt is just right with the Cloud Pillows from my previous post. My favorite 10-year-old model is back to show off another project and (yay!) my favorite 14-year-old decided to join her!


You Will Need:
• 1 3/4 yards of dark blue quilting cotton fabric
• 1 3/4 yards of light blue quilting cotton fabric
• For the rainbow stripes, you can use purchased single fold bias tape or you can make your own. I like to use a variety of widths, but the widths given here are suggestions; use any widths of bias tape you like.
|
Color |
Single fold bias tape yardage for night rainbow (dark blue background) |
Single fold bias tape yardage for day rainbow (light blue background) |
Fabric yardage if making your own bias tape (includes yardage for BOTH night and day sides of the quilt) |
|
Red |
2 1/8 yards- 7/8" wide |
3 yards- 1/2" wide |
1/4 yard |
|
Orange |
1 3/4 yards- 7/8" wide |
2 7/8 yards- 1/2" wide |
1/4 yard |
|
Yellow |
1 1/4 yards- 1" wide |
2 1/2 yards- 7/8" wide |
1/4 yard |
|
Green |
1 yard- 7/8" wide |
2 1/4 yards- 1/2" wide |
1/4 yard |
|
Blue |
7/8 yards-1/2" wide |
2 yards- 1/2" wide |
1/4 yard |
|
Indigo |
3/4 yards- 7/8" wide |
1 1/2 yards- 1/2" wide |
1/4 yard |
|
Violet |
1/2 yard- 1/2" wide |
1 1/4 yards- 1/2" wide |
1/4 yard |
• 67" x 84" piece of batting
• 3 7/8 yards quilting cotton fabric for backing
• 1/2 yard quilting cotton fabric for binding
• Yarn for tying
• Coordinating thread
• Fusible tape such as Wonder Tape (optional)
• Basic Sewing Tools including a sewing machine
• Bias tape maker (if making your own bias tape). You may choose one width or several widths. Here I used 1/2", 7/8" and 1" bias tape makers.
• Edge stitch foot for your sewing machine (optional)
• Painter's tape and safety pins for making the quilt sandwich
Finished Size:
59" x 76"
Instructions
1. First, cut the background pieces. Cut a 33" x 59" rectangle from the dark blue fabric. Cut a 59" length from the light blue fabric. Your fabric may be anywhere from approximately 40" to 45" wide. Trim the selvage edges from each long side, keeping the sides parallel to each other.
2. If making your own bias tape, follow the supplemental instructions below to make the amounts of bias tape as indicated in the chart above.
3. Pin the bias tape in rainbow order in pleasing arches on the dark blue background. There is no template for this-just adjust the arches so they are smooth. It is not necessary to space the arches evenly. The uneven spacing adds interest. I like to pin all of the arches in place before sewing but you can pin and sew one arch at a time. Use enough pins to ensure the arches don't move. If you prefer, you can use a fusible tape, such as Wonder Tape, to fuse the arches in place before you sew them.
4. Next, sew the arches in place. Use coordinating thread for each arch and an edge stitch foot for your sewing machine if you have one. Stitch on both sides of each arch, just inside the edge of the bias tape. Repeat for all of the arches on the light blue background.


5. Sew the dark blue section and the light blue section together, matching the long sides with the highest points of the rainbow arches.
Finish the Quilt:
1. To piece the quilt backing, cut the backing fabric in half widthwise so you have two equal pieces. Trim the selvage edges off both sides of each piece. Place the two backing pieces right sides facing and sew down one long side. Press the seam open.
2. Lay your backing right side down on the floor. Using masking tape or painter's tape, tape the backing to the floor. Work back and forth on opposite sides so the backing remains even and square. Lay the batting on top of the batting, smoothing it out from the center. Place the quilt top onto the batting right side up and smooth it out from the center. You can tape the top down also if you like.
3. Starting from the center, pin the three layers together with safety pins, about 6" apart. Remove the tape and lift the quilt from the floor.
4. Now, tie the quilt together approximately every 3-6" or according to the recommendation on the packaging for the batting you chose. I doubled the yarn for my tufts. Take a stitch into the quilt and then back up again, making a stitch length of about 3/16" on the back. I made a bow and then knotted the bow again to make a fluffy tuft. Trim the batting and backing even with your quilt top.


5. Now bind the quilt. Cut the binding fabric into seven 2 1/2" wide strips from selvage to selvage. Trim off the selvage ends. Piece the short ends of the strips together to make one long binding strip. Press the seams open. Fold the entire binding in half widthwise, wrong sides together, and press.
6. Carefully match the raw edges of the binding to the raw edge of the front of the quilt. Starting about 6" from the beginning of the binding, use a 1/2" seam allowance to sew the binding to the quilt. To make mitered corners, sew the binding to 1/2" from the adjacent side. Fold the strip of binding up at a 45º angle to the corner. Then fold the binding back toward the adjacent quilt side. Start sewing the next side 1/2" in from the corner. Continue to sew the binding around the quilt until you get 12" away from where you first started attaching the binding. Overlap the end of the binding with the beginning of the binding and trim the end of the binding 1/2" past the beginning of the binding. Open both ends of the binding flat and piece them together with right sides facing. Finger press the seam open and refold the binding. Sew the joined binding section onto the quilt.
7. Fold the binding around to the back of the quilt and hand sew in place. You can find my instructions on Invisible Hand Sewn Quilt Binding here.
To Make your own Bias Tape:
1. First, fold the fabric. With the fabric flat in front of you, vertically. Take the bottom right corner and bring it up diagonally to the left so the bottom edge of the fabric is even with the left edge.
2. Place the gridded ruler at a right angle to the diagonal fold, so it also hits that right corner that you brought up to meet the left side. Cut from the fold to the corner.
3. Cut strips of the desired width, depending on the width of the bias tape you plan to make. Following the directions on the Bias Tape Maker package, cut the bias strips to the correct width. NOTE: For most colors (except blue and violet) I used a different width bias tape for the night side and the day side. Be sure to cut strips for BOTH sizes out of the 1/4 yard of fabric for each color.
4. Now sew the strips together. Place the ends of two strips right sides together so the strips form a right angle. Offset the strips so that they intersect 1/4". Sew the strips together. so you have one long length.
5. Follow the instructions on the Bias Tape Maker package to make the bias tape.


Don't forget to check out all of the other Sew a Softie tutorials!
