Sew Good Blog Hop: Make a Quilted Door Stop
Yay! You're here! Thank you for stopping by the Sew Good blog hop!
I knew it would be fun to sew with my own fabric (you can find out about all the projects I have been working on here ), but I didn't realize that it would be even more fun to see what other people do with it. Check out the schedule at the bottom to see what everyone else is making!
Here is what's going on in my studio:
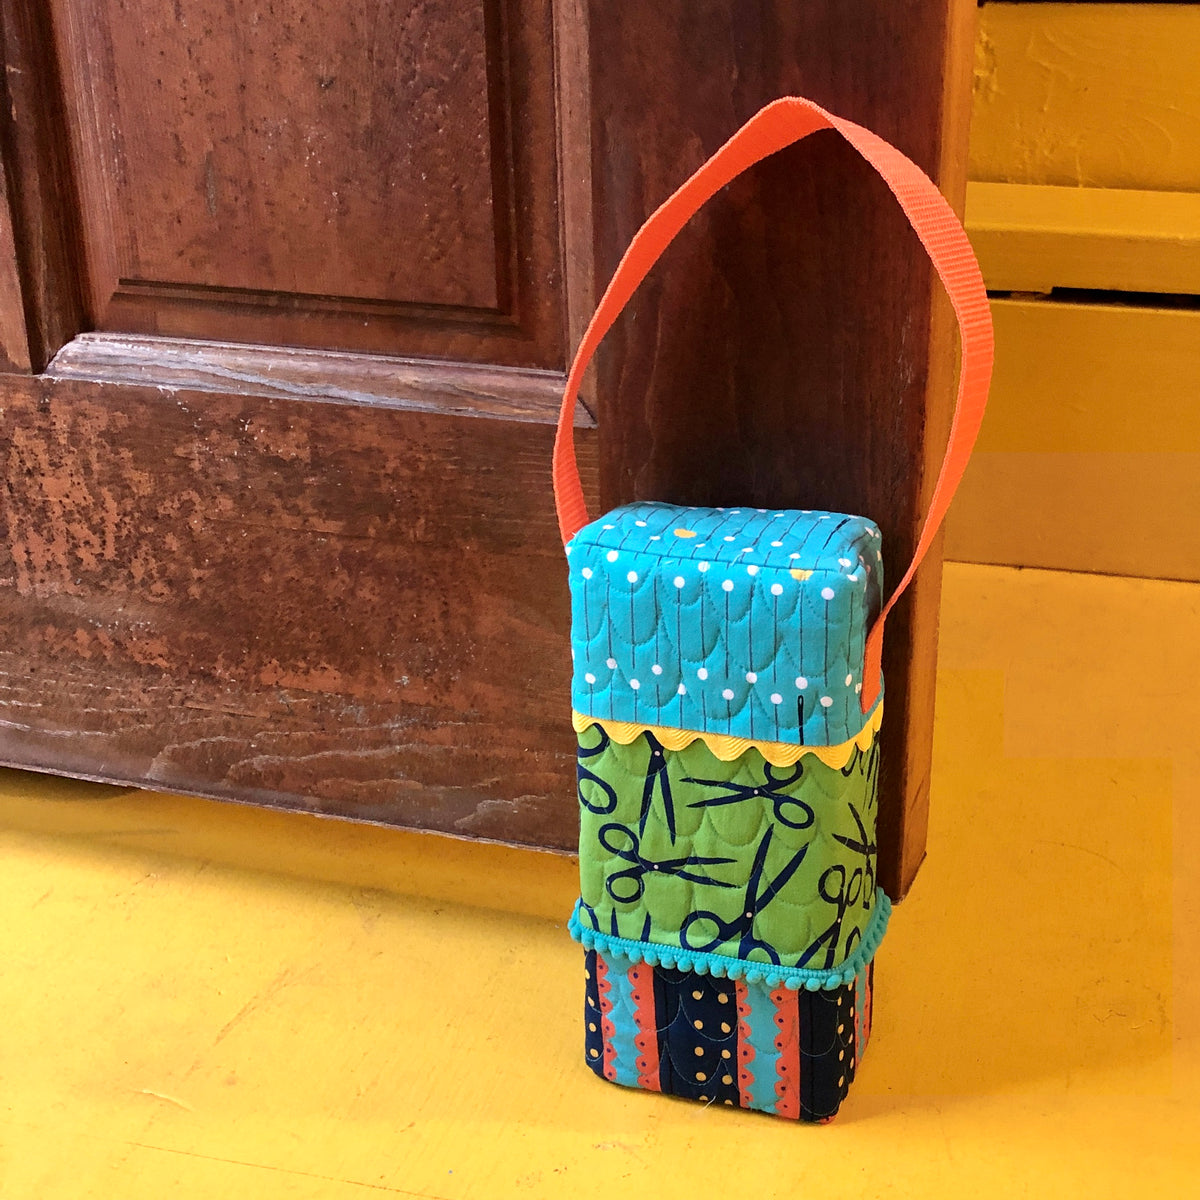
I am fortunate to have a back door on my studio that leads out onto our deck. It is lovely when the weather is nice to be able to open the door and have the breeze come in, or take some work out onto the deck. The problem is that the door just doesn’t like to behave. It pretends that it will stay open, but once your back is turned, it quietly eases shut. I find myself always looking around for something to hold the door open-a too light bag, the step ladder that, without fail, always falls over. Yes, I’m sure there is some way to adjust the door to get it to stay open on its own, but that seems way too much for my brain. It was time for a door stop and my fabric collection, Sew Good, was just right for a studio accessory! Here is how I made a quilted door stop from a brick I found in our garden:

Materials
- 1 standard brick (2 ¼” x 3 ⅝” x 8”). If you need to use a different size brick, you will need to adjust the instructions accordingly.
- ⅛ yard or fat eighth each of 3 fabrics (A, B, C).
- 14” each of 2 trims such as ball fringe and rick rack.
- Strapping for handle.
- 18” square piece of Batting.
- ⅜ yard or fat quarter of Backing fabric-this will be inside and will not be seen, so use any old ugly fabric you have sitting around.
Cutting
- From fabric A cut 1 strip 13” x 3” and cut 1 rectangle 3” x 4 ⅜”.
- From fabric B cut 1 strip 13” x 4”.
- From fabric C cut 1 strip 13” x 4” and cut 1 rectangle 3” x 4 ⅜”.
- From batting cut 1 rectangle 14” x 11” and 2 rectangles 4” x 5”.
- From Backing cut 1 rectangle 14” x 11” and 2 rectangles 4” x 5”.
Sewing
Seam allowance is ¼” unless noted otherwise.
1. First, sew the trims between the fabric A and B strips and fabric B and C strips. Lay one of the trims along one long 13” side of fabric A and lay the fabric B strip on top, right sides together. Sew the seam so you are sewing the trim in between. If using rick rack, sew the seam so you are sewing down the center of the rick rack. If using ball fringe or some other bulky trim, use a zipper foot on your machine to get close to the bulk. You can adjust your seam allowances slightly if needed. Lay the other trim along the remaining 13” side of the B fabric strip and lay the long fabric C strip on top, right sides together. Sew the seam.


2. Place the Batting on top of the corresponding backing fabric. Place the main pieced fabric on top of the large batting, right side up, and the 3 x 4 ⅜” fabric pieces on top of the small batting, right side up. Pin the layers together. Quilt the 3 sections as desired. I used my sewing machine to free-motion scallops on all of the pieces.


3. Now add the handle. Trim the excess batting and backing. If using strapping that tends to unravel, seal the ends by carefully melting the ends with a match or candle. With fabric A at the top, place the main quilted piece right side up. Mark the top center. Measure 2 ½” on each side of the center and mark. Place one end of the strapping to the outside of 1 mark and the other end of the strapping so it is on the outside edge of the other mark. There should be 5” between the strapping. Move the ends of the strapping so they are just above the A/B seam and pin. Sew the strapping to the fabric along the ends, 1” up on each side, and across, and diagonally.

4. With right sides together, fold the main quilted piece in half, matching the short ends of the A, B, and C strips. Sew the seam. Turn the piece right side out to create a tube. Slide the brick into the tube so that the seam is in the center of one 3 ⅝” side, the handles are on the 2 ¼” sides, and fabric A extends about ½” past the end of the brick.

Clip the 4 corners on the A fabric side a scant ¼”.

5. Remove the brick and turn the tube right side in. Pin the small quilted A rectangle to the fabric A end of the tube. The clipped corners will allow you to sew right into the corners. Clip the corners at a diagonal to reduce the bulk.


6. Turn the tube right side out again and insert the brick. Trim the fabric C side to ½” beyond the bottom of the brick. Tuck the edges inside. Sew the small quilted C rectangle to the fabric C end of the tube, turning under the edges as you go.